

Printing

"A photographic print is the final realisation of an image, it's the end of the journey."
After the shutter has been fired there is so much that can be done to a digital file to influence the resultant print. I am not a heavy manipulator of images, my sole objective is to reproduce what I saw and felt when I took the shot. With digital photography we now have many opportunities to correct for deficiencies within an image, (contrast, variations of brightness, tonality, colour balance and saturation). While I strive to capture the best image possible, adjustments invariably need to be made to produce a satisfactory print.
Papers
There are a wealth of inkjet papers available to us today, from many different manufacturers and distributors. Broadly you get what you pay for, and anyone who prints on economy papers would do well to at least try using a better quality product and assess the difference. I guess it's probably true to say that if you've got a stunning image it will do well printed on anything, but the paper choice can play an important part in the success and finish of a completed print.
The paper I use is heavily influenced by the type of image I am printing. The aesthetic appeal of a rich lustre, the tactile quality of a texture, and the way each paper offers variations in tone, colour and surface should not be ignored.
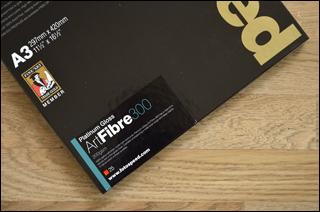
Following Fotospeed's sponsorship I tested quite a few of their products, examined swatches, and have now arrived at a small number of paper's that suit my work well. Two good general purpose papers are Fotospeed's PF Lustre, and Photo Smooth Pearl. They are reliably good and resistant to surface damage, (being resin coated). If I wanted just extra depth and quality I loved Platinum Gloss, which was superb, but this has now been discontinued, and replaced by Platinum Gloss Art Fibre. (It's similar, but not the same!) When printing monochrome images again Platinum Gloss was my normal choice, although Fotospeed Platinum Baryta, (which has a smoother surface), can work well, particularly if I want a slightly warmer print tone.
Probably 80% of my work is printed using these papers, but if I want to print a more painterly or artistic image then matt surfaces are utilised. For prints with a smooth surface I generally use Fotospeed Matt Ultra, (with a bright white base), or Platinum Matt. I use textured papers occasionally too and turn to Natural Soft Textured Bright White (I printed my Fellowship on this paper) or Platinum Etching 285 which are excellent.

Profiling
In all my photographic ventures I always strive for the very best possible quality, and in order to achieve the nicest prints it's important to utilise profiles. These not only ensure accurate colours, but also dictate the amount of ink that is laid down onto the paper. Consequently I use a Datacolor Spyder 5 Pro to profile my monitor, and custom paper profiles for each paper that I use. (This free service from Fotospeed is quick, easy and accurate).
"What you see..."
It is important to realise that one can never achieve exactly what you see on your computer monitor in a completed print. Because the monitor is displaying an image by transmitted light the viewed image will often look brighter, be more contrasty, and have a bit more impact. By comparison a print relies on either dyes or pigments that are laid onto the paper by the printer, so the resultant print will often look different to the image on the monitor. Ultimately it is what the print looks like that is important, so although I will work upon an image until I think it looks right, a test print will often dictate further tweaks and modifications until I arrive at a satisfactory result.
"A print is not finished until it is mounted."
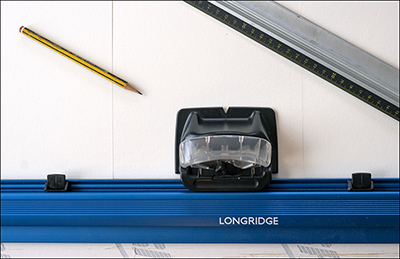
Having produced the best print that I can it is also important to present it properly. I'm pleased to be supported by Longridge Mount Cutters who make an excellent British product that provides a professional finish for my mounts. The choice of the mount, it's tone or shade, and the relationship of the frame to the image is an important final consideration in the completion of my work. I use archival PH7-70 tape to fix the print to the backing board, and Tesa picture framer's tape to secure them to the mount.
And finally.. why print?
Digital photography allows us to produce lots of pictures, but recently around the clubs I have detected a certain reluctance to commit images to print, and rely upon digital projection to show work. However the variations of digital projectors and screens, projection software, colour profiling and management can often produce an unpredictability that results in images looking either subtly or radically different when projected onto a screen. A print however allows the photographer to decide exactly how large and bright the image is, and control tonality, colour saturation, and presentation to produce a satisfying and controlled realisation from that initial image.
In addition I always advocate printing your own images. It's hard to justify the extra work and associated cost until you consider the value of your photographic gear. It amazes me that photographers regularly economise on printing, paying less than a pound for an A3 print. Where do you think the quality of your precious photographs is going? To print yourself gives you total control, and IMMEDIACY. No longer do you have to wait for the postman to deliver your prints, only to be disappointed by the results. Far better to bite the bullet, learn to print, and be in control of the process. Granted there is a lot to learn, but once mastered the satisfaction is wonderful.